
Import and Edit 4K/2K/HD XF-AVC in DaVinci Resolve 17/16/15
How to import and edit XF-AVC footage in DaVinci Resolve 17, 16, 15? This article introduces a simple and helpful Canon XF-AVC Converter to help people who need transcode 4K, 2K and HD XF-AVC .mxf files on macOS Big Sur or Windows 10. If you are looking for such a solution, feel free to keep reading.
What is XF-AVC file format?
XF-AVC is a brand new Canon own video format for the efficient recording of high-image-quality 4K, 2K and HD video footage, which realizes a high data-compression rate without sacrificing image quality. XF-AVC will deliver enhanced workflows across various stages of the production process, from shooting to editing. XF-AVC uses the MPEG-4 AVC/H.264 video compression format, and packages video recordings in an MXF wrapper. Canon develops XF-AVC video format targeting 4K professional camcorders, and employs XF-AVC primarily in the Company’s 4K-compatible professional-use video camcorders, such as Canon XF705, Canon XF405 Canon XC15, Canon EOS C300 Mark II.
What’s the best XF-AVC Video Converter for DaVinci Resolve?
Acrok Video Converter Ultimate is positioned as one of the best XF-AVC Video Converters on the market. It is able to run on both Mac and Windows platform, being fully compatible with the most recent macOS Catalina and Windows 10. This program can convert XF-AVC Video to almost whatever format you request for editing, playing, sharing. With it, you can transcode XF-AVC to DNxHD, Apple ProRes, H.264, H.265 and more. You can download a demo version to have a try. They are not free but it is totally worth it.
Free download XF-AVC to DaVinci Resolve Converter


How to convert XF-AVC for using in DaVinci Resolve 17/16/15?
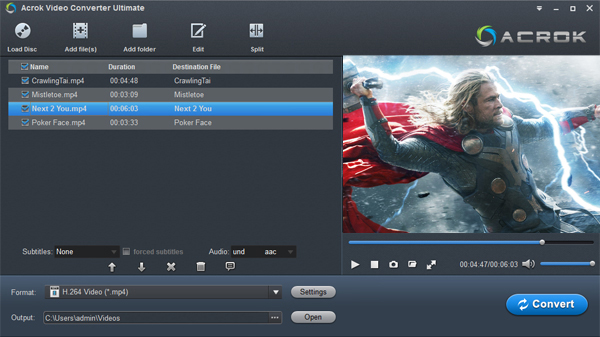
Step 1: Launch Acrok Video Converter Ultimate as the best XF-AVC to DaVinci Resolve conversion software. Click “Add File” to load source files that you want to convert. You can play the loaded vides with right preview window.
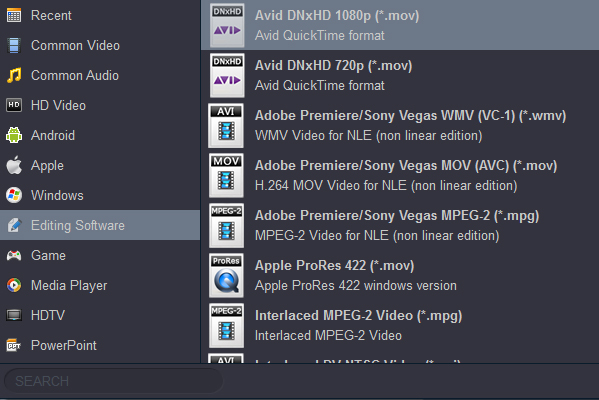
Step 2: From ‘Format’ list, choose an output format. As we know, DNxHD and ProRes codec are good for DaVinci Resolve editing, so we can chooose DNxHD MOV and ProRes MOV as output format. You can get these profiles under “Editing Software” category.
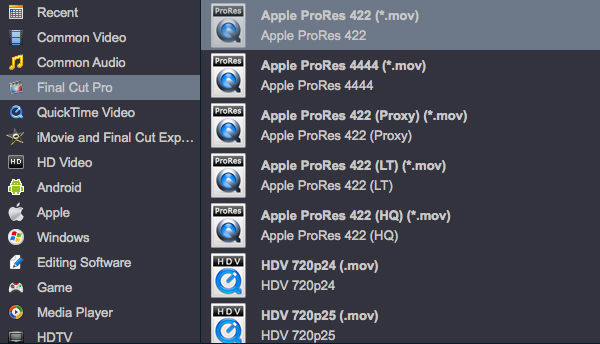
Note: If you are Mac user and want to get ProRes video for importing into DaVinci Resolve, please select ProRes MOV under “Final Cut Pro” category. You can import and edit the converted videos in FCP X, FCP 7 and FCP 6.
Step 3: Adjust video and audio settings (for advanced users)
If necessary, you can click ‘Settings’ button and go to ‘Profiles Settings’ panel to modify video and audio settings like video encoder, resolution, video bit rate, frame rate, aspect ratio, audio encoder, sample rate, audio bit rate, and audio channels. 3D settings are also available.
Step 4: Click ‘Convert’ to start Canon XF-AVC files to DNxHD or ProRes conversion on Windows 10 or macOS Big Sur.
When the conversion is done, click ‘Open’ button to get the converted video files, then import the videos into DaVinci Resolve 17, 16, 15 for further editing.